
Zellige Ceramic Textures Guide
, by Wave Crest Design Team, 5 min reading time
, by Wave Crest Design Team, 5 min reading time
✦ Designing a kitchen with backsplash? Explore our kitchen backsplash tiles in porcelain and ceramic — samples available.
Shop Kitchen Tiles →Mastering the Art of Imperfect Surfaces: Specification and Layout Rules for Zellige-Style and Dimensional Ceramics
Modern commercial and luxury residential spaces frequently wrestle with architectural sterile design—an unintended consequence of perfectly flat drywall, laser-straight metal trim, and uniform composite materials. To inject warmth, historical character, and human craft back into these environments, leading interior designers are turning to dimensional ceramics and Zellige-style wall tiles.
Characterized by irregular surfaces, chipped edges, and intense color transitions, these tiles reject factory uniformity in favor of rustic elegance. However, working with highly irregular materials requires a major departure from standard tile installation methodologies. This article serves as an essential guide for designers, project managers, and tilers executing high-end projects using Zellige-style and dimensional handmade ceramics.
True Zellige tile is a traditional Moroccan art form where natural clay is hand-molded, kiln-fired using olive branches, and hand-cut with a heavy iron hammer. The resulting tile contains a series of defining physical anomalies:
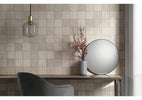
When massed together across a kitchen backsplash, accent wall, or shower enclosure, these individual variations act like tiny mirrors catching light from different angles. The wall shimmers dynamically, displaying a depth of character that factory-stamped tiles cannot replicate.
Because Zellige-style tiles possess significant color variation—frequently classified as a V4 Substantial Variation rating—meticulous planning is required before mixing mortar.
Never allow an installer to tile directly out of a single box sequentially. Glaze batches naturally shift across different production runs, meaning Box 1 might contain significantly lighter tiles than Box 6. If installed box-by-box, the wall will feature jarring patches of dark and light tile blocks. Instruct the installation team to open a minimum of 4 to 6 boxes simultaneously. Lay out dozens of tiles on a clean floor space to visually balance the shade variations, chips, and undulations before permanently adhering them to the wall substrate.
Because these tiles lack uniform edges, starting an installation without a defined centerline can cause rows to drift off-level rapidly. Establish clear vertical and horizontal datum lines using a self-leveling cross-line laser level. Plan your cuts so that trimmed tiles terminate in internal corners or along hidden wall boundaries, leaving the beautifully irregular hand-cut edges prominently displayed along highly visible external borders.
The most critical mistake a contractor can make with Zellige-style tile is attempting to install it using standard plastic tile spacers to enforce a uniform grout joint.
Zellige is traditionally installed skin-to-skin, meaning the tiles are placed directly against one another with a nominal grout joint of virtually 0mm to 1mm. Because the tile perimeters are hand-chiseled and inherently irregular, a natural, tiny gap will form between the pieces on its own. Attempting to force a 1/8-inch or 1/16-inch uniform joint using standard plastic spacers creates a highly disjointed, awkward grid that completely ruins the hand-crafted look.
Lippage describes the height difference between adjacent tile edges. In standard porcelain installations, lippage is considered a defect. In Zellige installations, a controlled amount of lippage is the primary goal.
Because the tile backs are uneven, the installer must use a high-quality polymer-modified thinset mortar and build up a variable mortar bed behind the tiles, adjusting individual depths by hand. The goal is to allow the tiles to step forward and backward subtly across the wall face, maximizing light refraction without exposing excessively sharp or structurally vulnerable raw edges.
Once the tiles are set, the choice of grout and finishing methodology dictates the ultimate success of the project.
Because Zellige is installed with almost zero joint spacing, the grout must be applied using a highly fluid technique. Specify a premium, non-sanded grout. Sanded grouts contain quartz particles that cannot physically penetrate the tight crevices between hand-placed tiles, and rubbing sand particles across the delicate glaze can result in surface scratching.
Use a flexible rubber grout float to pack the fluid grout deeply into every microscopic void, micro-chip, and natural surface pit along the tile perimeters. When wiping away the excess grout, use a damp, dense hydro-sponge with a light touch. Do not over-wash the joints, as digging grout out from between the irregular edges will weaken the structural bond.
Once completely cured, high-quality glazed ceramics are exceptionally easy to maintain. They are non-porous and highly resistant to chemical staining, making them an excellent choice for heavy grease zones behind commercial ranges or damp bathroom conditions. Clean exclusively with warm water and soft microfiber towels mixed with a pH-neutral, non-abrasive liquid detergent. Avoid harsh acid cleaners or heavy scour pads that can dull the delicate micro-crazing of the historic glaze.
Architectural Tile Specifications Guide
Our site uses cookies. By clicking on accept you agree with our Terms of Service and privacy policy.